
August 8th, 2023
How to Setup Static and Dynamic Row Level Security (RLS)
in Power BI?
Row Level Security (RLS) is a key aspect of data security and governance strategy for organizations. Simply put, Row Level Security is the way we restrict data presented in a report based on user login. Admin teams can provide instructions to enable visibility of data and reports for users based on their roles.
This ensures that each user has appropriate data visibility and effectively protects sensitive user data. For example, restricting user access to payroll or sales data.
Through this blog, we explore the concept of RLS, different use cases and types. You can also learn how to set up Static and Dynamic RLS in Power BI.
Row Level Security in Power BI use cases
Here are some of the use cases of Row Level Security in Power BI:
Location-based RLS
When user is provided access to information within a specific region, like city or a country.
Employee-based RLS
When user receives access to information relevant to his responsibilities only.
Business line-based RLS
When user can access information related to a business line in the form of a product, department, or unit.
Apart from this, RLS can be implemented based on other factors such as time or specific customers/groups.
Different types of Row Level Security (RLS) in Power BI
The complexity of the RLS set up varies depending on the number of dimensions and dimension members that require security.
If you have a small, fixed list of users and a static number of dimensions, then a basic RLS setup will work. This approach involves creating roles for different user types and then applying filters to the desired dimension tables.
📌 Power BI DAX – Difference Between Concatenate() and Concatenatex() >>
However, if your user list is longer and your dimensions are subject to changes, you will need the dynamic approach.
Static RLS setup in Power BI
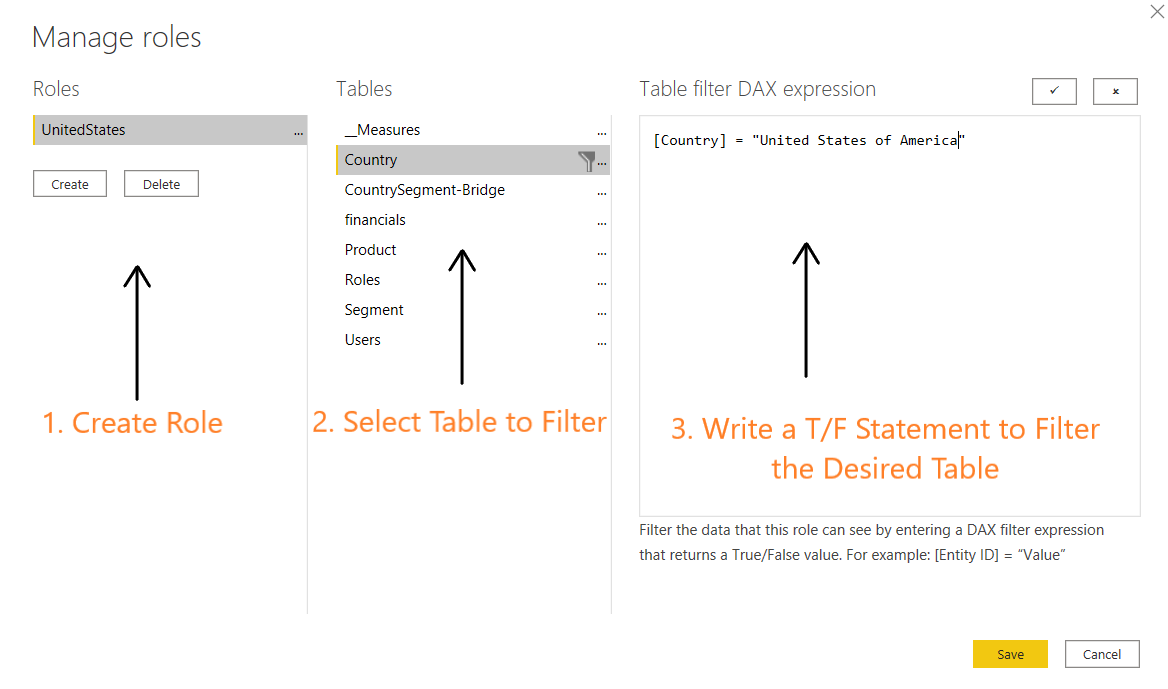
Let’s start with a static example. Consider the scenario where you would like to secure the country table to one country per user. You would go through the following steps:
- On the ‘Modeling’ tab in the Power BI toolbar click on “Manage roles”.

- Create a new role, select the table which you want to get filtered based on the role, and then create a True/False statement to filter this table with.
📌 Snowflake For Data Lake Analytics – Jumpstart Guide >>
- Now that the role has been created test the functionality using the ‘View as’ button.
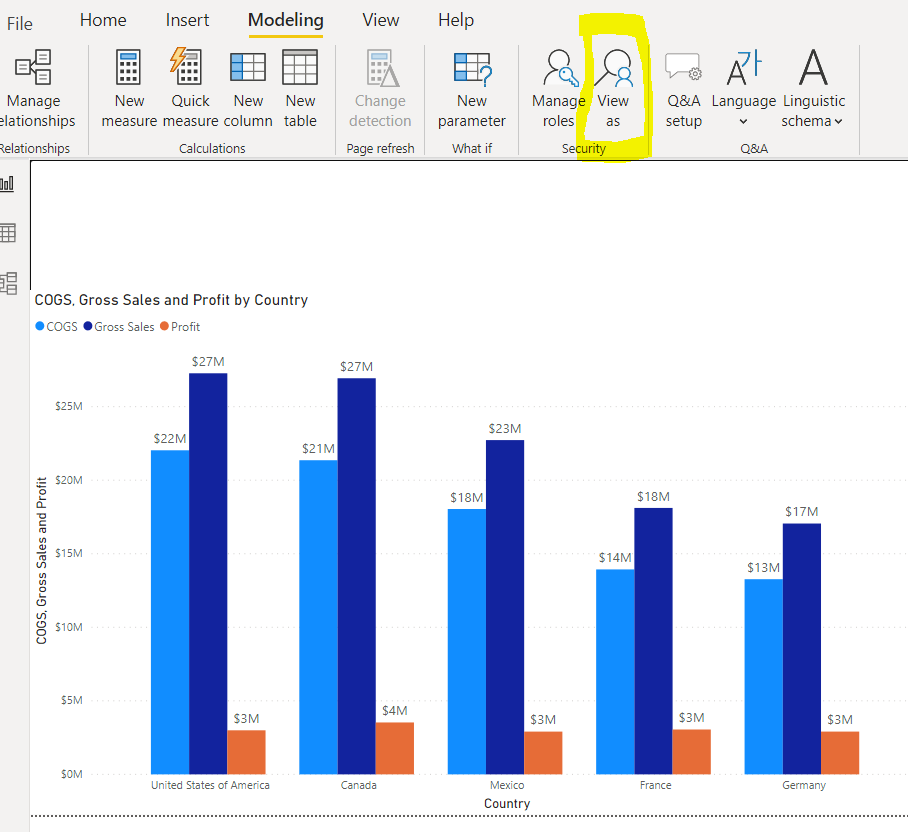
- Check the box next to the role you would like to test.
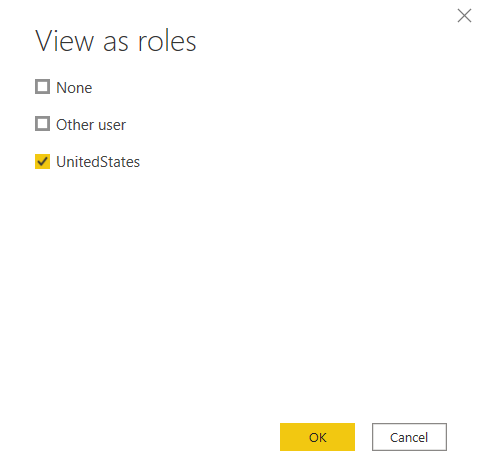
- You are now impersonating the role (notice the yellow warning bar indicating the current role being applied).

📌 Supercharge OBIEE (and OAC/OAS) With Power BI [eBook] >>
- Repeat these steps for every desired role.
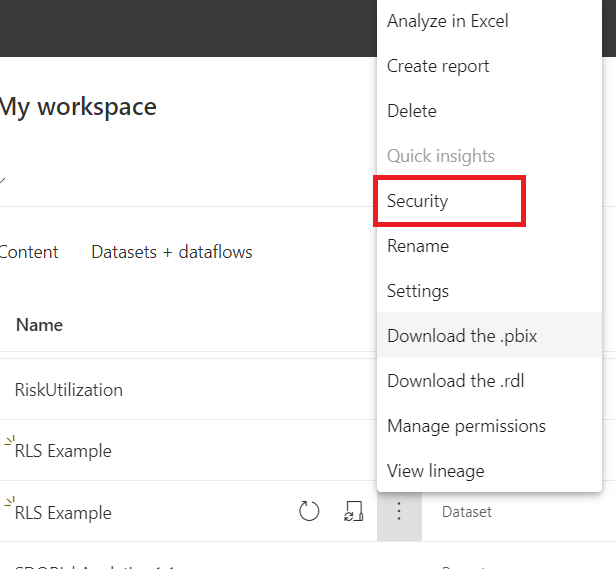
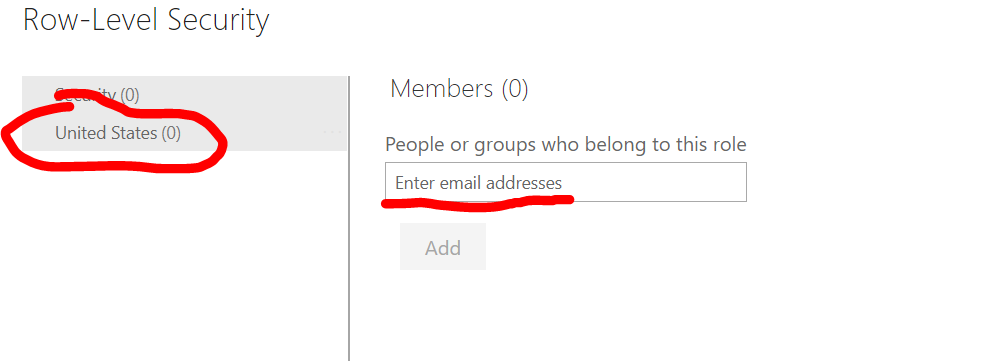
- After you have uploaded this report to the Power BI portal, go to the Security settings for the data source to assign Users to the desired roles.

If you have a longer list of users or more dimension changes then you will likely want to manage your roles and users in a more dynamic fashion. We list out the steps for setting this up in the next section.
Dynamic RLS setup in Power BI
Rather than assigning users to roles in the Power BI portal, we can keep a list of users externally (in a database or simply in a spreadsheet) and use the USERNAME() or USERPRINCIPALNAME() functions to filter the secured data tables.
📌 Reference Architecture for Power BI OBIEE/OAC Integration >>
Let’s see the steps now!
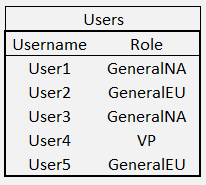
- Determine different user roles.
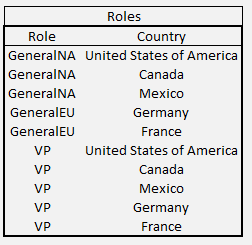
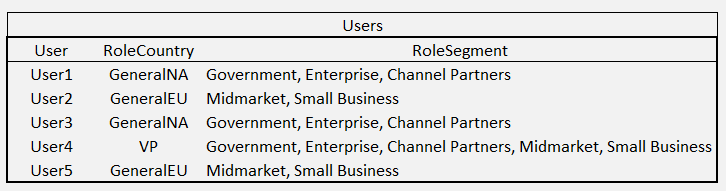
For instance, for general users, we want a role to secure the data for countries by continent. So, in the case of our sample data, there should be a mapping of users to North America and Europe.
If the user is a “VP” we will be granting them full access.
The ‘Users’ and ‘Roles’ tables will look something like this:
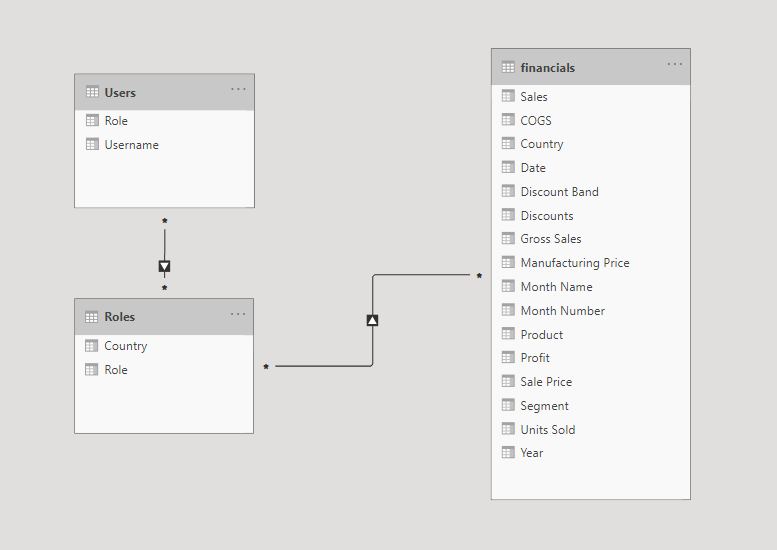
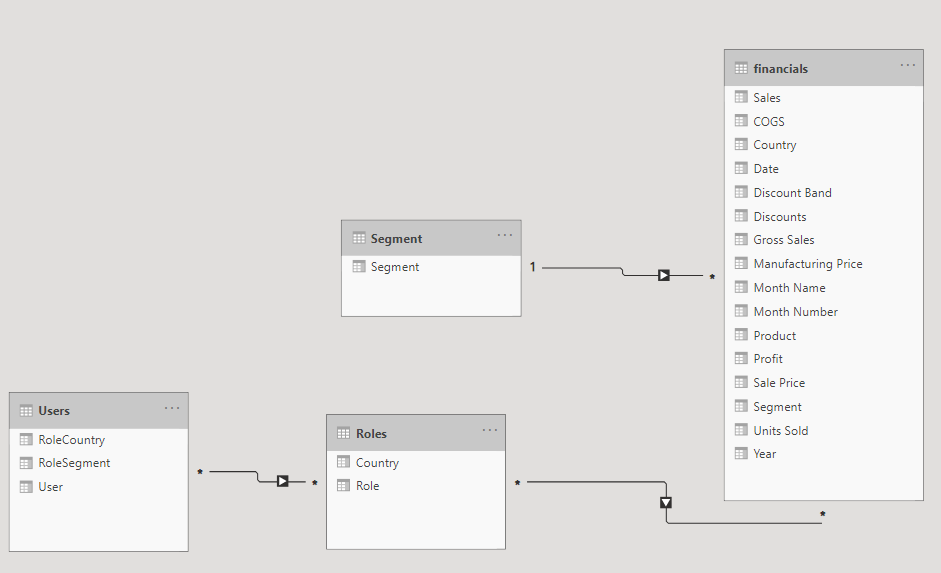
- Setup Table Relationships
Link the tables together and then to the fact table as pictured:
Users[Role] 🡪 Roles[Role]
Roles[Country] 🡪 financials[Country]
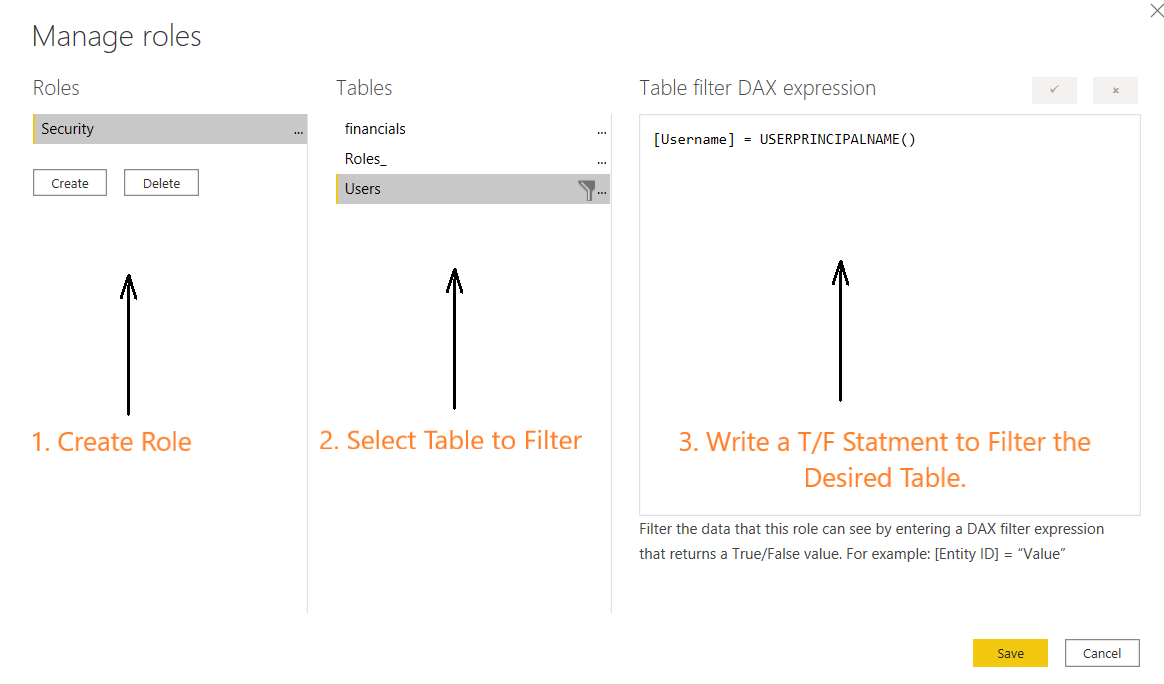
- Manage Roles
Create a new role. Select the ‘Users’ table and create a True/False statement to filter this table with. In this instance, we will be using the function USERPRINCIPALNAME(). This function returns the email address associated with the Power BI Portal login of the individual user.
- Test Roles
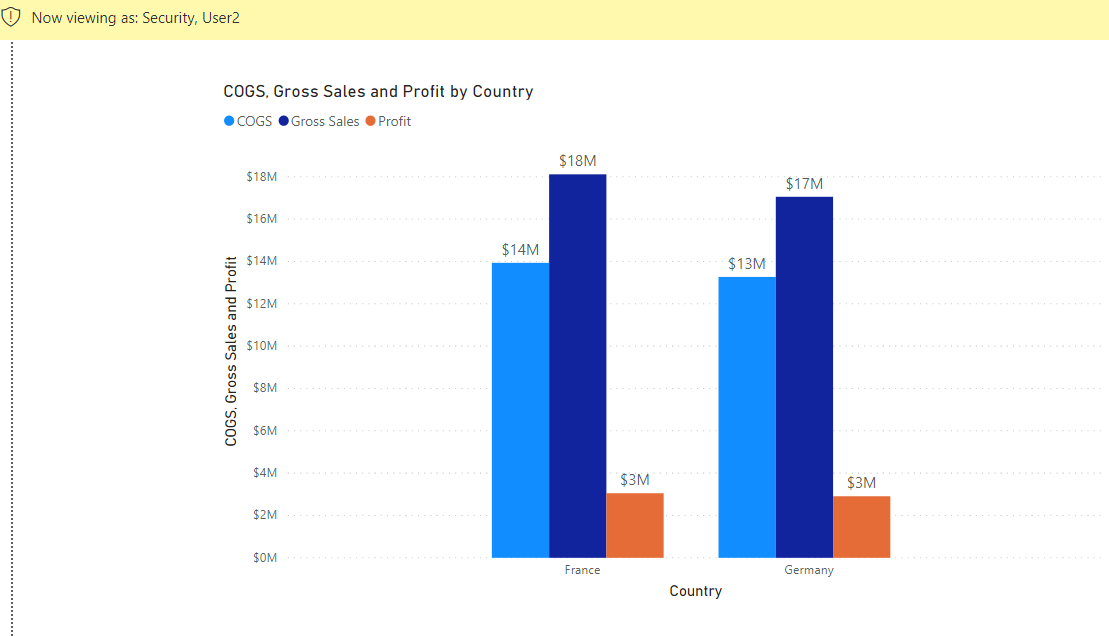
Now that the role has been created test the functionality using the ‘View as’ button.
Select the role you want to test (Security) and also the User you want to test (User2)

Because User2 is set up to view European countries only we immediately see the data filtered to just France and Germany.
From now on whenever you make changes to the user table and or roles table that is connected to this report it will flow through automatically. No need to go in and individually select each user to assign to each role.
Further complex scenario
Now, for added complexity, let’s explore securing more than one dimension dynamically using more advanced DAX.
Let’s say we want to assign our roles as defined different business Segments.
📌 5 Must-haves of Power BI OBIEE Connectors [Infographic] >>
We can assign a list of segments to individual users, and filter the segment values using the CONTAINSSTRING() function.
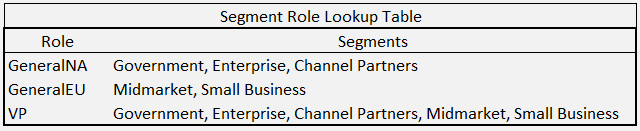
- We add a column, RoleSegment column to our Users table. This can be populated using a LOOKUP() function on RoleCountry to a separate table, or customized manually for each user. The best practice is to use the table lookup method.
- In this case, we have a seperate Segment table connect to our main fact table. There is no need to setup a direct connection to this table since we will be filtering the security roles using DAX. The schema will look something like this:
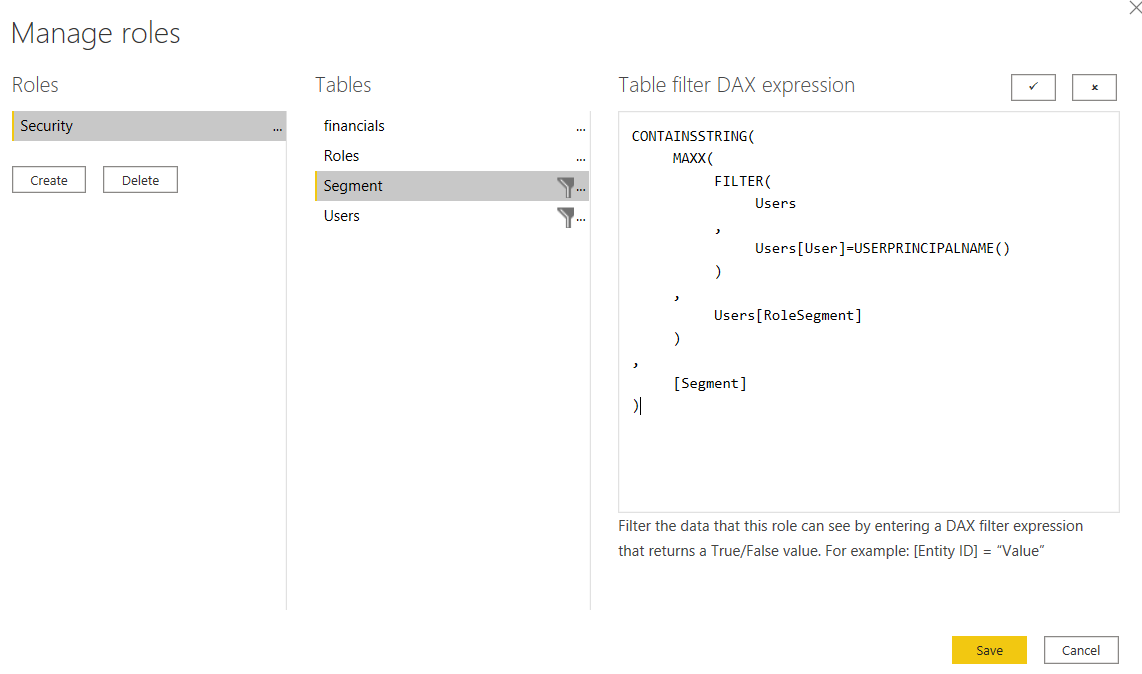
- In the ‘Manage roles’ wizard (used earlier) implement the following DAX on the Segment Table on the Security Role.
📌 How to Securely Connect Power BI to OBIEE and OAC? >>
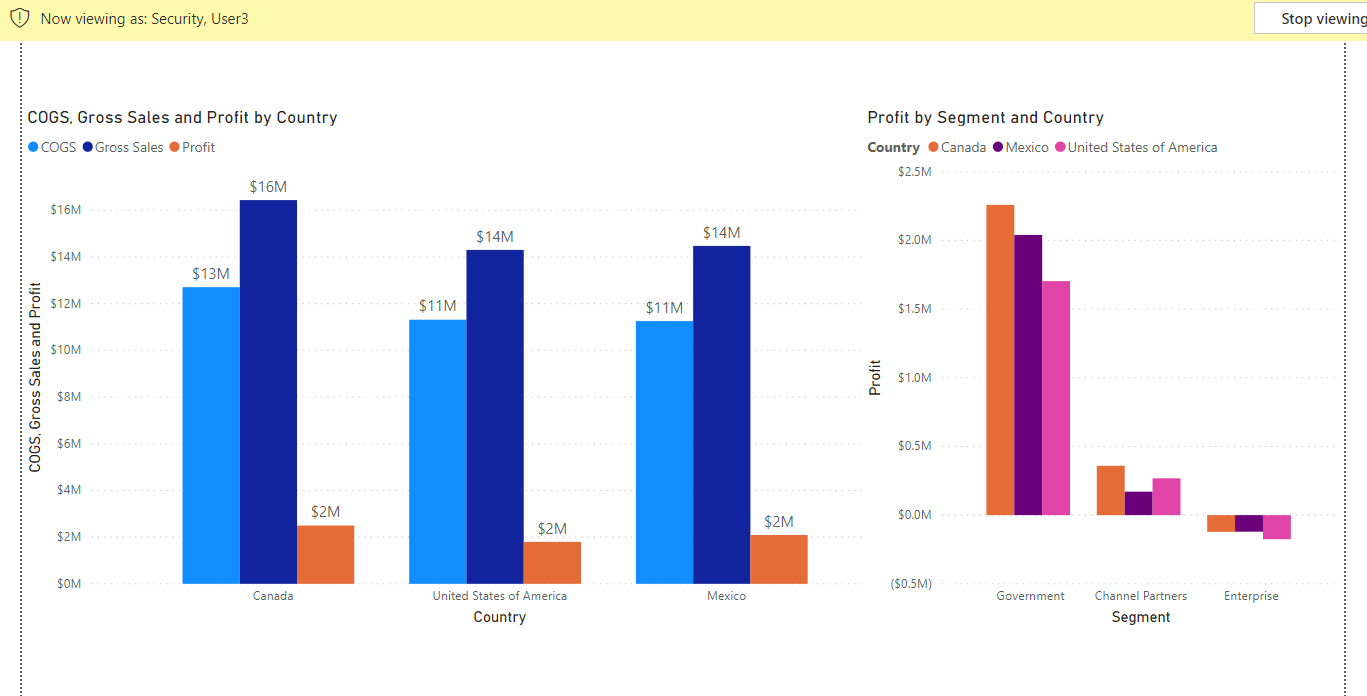
This DAX will filter the segment table down to any members that are contained in the comma-separated list in the RoleSegment field above. Now when we imitate User3 we see not only the countries filtered to North America alone, but also the Segments limited to those in the list for “GeneralNA”.
Using these two methods as a guide you will be able to set up security for as many dimensions as you see fit within a single data model.
Conclusion
Row Level Security is a capability of Power BI to restrict user access based on their login and other factors. This data security feature ensures protection of sensitive data and better data governance framework for organizations. RLS can be implemented for different use cases such as location-based, business-line based, and employee-based.
We also looked at the two different approaches of RLS implementation in Power BI: Static and Dynamic RLS. Both approaches can be used depending on requirements. A complex scenario of securing more than one dimension dynamically can be done using more advanced DAX.
Are you a data and BI professional using Oracle and Power BI? BI Connector is a one-of-its-kind solution that helps connect Power BI/Tableau with Oracle data (OBIEE, OTBI, OAC, and OAS). You can also bring data from Oracle Fusion Analytics (HCM, SCM, CX, and ERP) within minutes using BI Connector.
Check out the banner below to know more.