October 18th, 2021
How to Setup Deployment Pipelines in Power BI?
Do you have a standardized Power BI release process dealing with Development, UAT, and Production environments?
If yes, you have probably dealt with the pain of syncing the Power BI content in different environments.
Most Power BI Developers deal with one or more pre-live environments with dummy datasets to ensure the reports and dashboards work as intended.
The developers, after ensuring everything works fine, plug the Power BI content into the live environment which is connected to the actual dataset for consumption by the end-users.
In this blog post, we’ll take a quick look at how Power BI’s deployment pipelines feature simplifies the developers’ task in syncing the different environments with a few clicks.
📑 Power BI Row Level Security (RLS)- Simplified Setup Guide >>
What’s a Deployment Pipeline in Power BI?
The Deployment Pipelines is a Power BI feature that helps developers to keep the different release environments (namely Development, Test, and Production) in sync with each other.
It is just a simple UI, where you can set up a Power BI release pipeline for the three different environments.
Once you set up the pipeline, you’ll have to just point out each of the stages to the appropriate data sources created in each of the release environments.
When the content or dataset in an environment differs from the next (or previous) stage of the pipeline, the feature spots and highlights the mismatch.
📑 Supercharge OBIEE With Power BI [eBook] >>
Note: The deployment pipeline feature can spot the differences at the report/dashboard/dataset levels, but not at the data level.
You’ll just have to simply run a comparison (with a click), and it highlights the exact content that differs. Then you can deploy the changes in the other environments as needed, again in a few clicks!
Wondering how’s this done?
Well, we’ll show you the steps involved in setting up the deployment pipelines, and help you get started with it right away!
Before we dive into the steps, let’s start with the considerations and prerequisites.
Deployment Pipeline Considerations
Here are a few considerations for you to take into account, before getting started with the Power BI Deployment Pipelines set up:
- In order to use Deployment Pipelines, you or your organization must have a Power BI Premium account. We’ll cover this consideration in specific in the Pre-requisites section.
- You don’t have to mandatorily have all the 3 environments. Even 2 will do. If you have just 2, you can use the Test and Production pipelines.
- The feature also supports backward deployment. So, if you already have a steady production environment, you can deploy it backward (to Test or Dev, based on your need) and set up the pipeline. The feature is not limited to any sequential orders.
- Recently, Power BI released REST APIs for the deployment pipelines. The APIs give you the wings to automate the syncing as well. The API documentation covers a few critical functions as of now, and Power BI will probably add more in the future.
- The Deployment Pipeline feature doesn’t support all data sources at present. We’ll cover this in specific in the prerequisites section.
📑 Power BI DAX – Difference Between Concatenate() and Concatenatex() >>
Prerequisites for Power BI Deployment Pipelines Set Up
The following are the prerequisites for Power BI deployment pipelines setup:
- Power BI Premium Account – As mentioned in the considerations section, you must have a Power BI premium account. Any of the following scenarios will get you access to the Power BI deployment pipelines feature:
- An organizational Power BI Premium capacity account, with a Pro account for the users. Here you need the Pro account for publishing reports from the Power BI Desktop.
- Power BI Premium account at per-user plan
- Workspace Permissions – The Deployment Pipelines are created at the workspace level. The workspace must be a Premium workspace (created with a Premium account), and you must be the Admin of that workspace.
Note: Currently it is not possible to create deployment pipelines for workspaces created with a non-premium account.
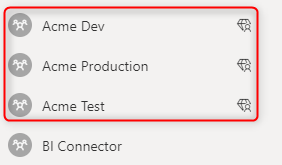
The premium workspaces will show up with a diamond as indicated below:
📑 How to Retain OBIEE Joins in Power BI? >>
- Data sources – The Deployment Pipelines feature supports the following data sources:
- Azure Analysis Services
- Azure Synapse
- SSAS
- Azure SQL Server
- SQL Server
- OData feed
- Oracle
- SAP Hana (only the import mode)
- Sharepoint
- Teradata
For other data sources, you can try using parameters, if that’s possible with your data source.
Steps to Setup Deployment Pipelines
Now let’s quickly run through the step-by-step Deployment Pipelines setup in Power BI. For this tutorial, we’ll adapt to the stages in the following sequence – Development, Test, and Production.
- Sign in to app.powerbi.com.
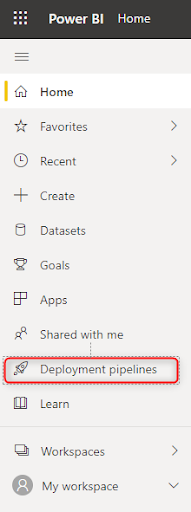
- In the left pane, click the Deployment Pipelines menu.
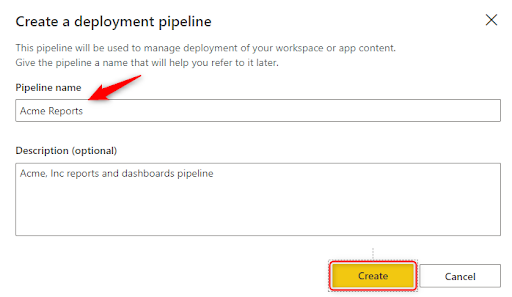
- Click the Create a Pipeline button. In the popup that opens, enter your Pipeline name (mandatory) and Description (optional).
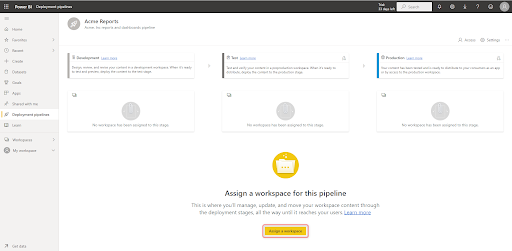
- Next, click on the Assign a Workspace button.
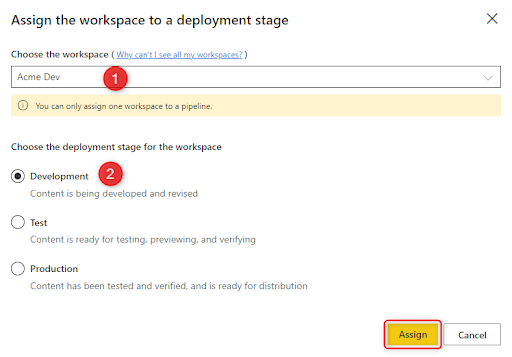
- Select the Workspace. (Note, only premium workspaces show up in the drop-down). Then select the deployment stage, and click on the Assign button.
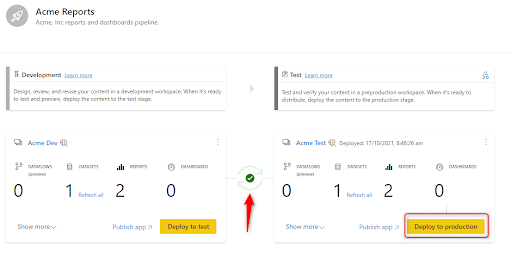
- Now your development environment is set up in Power BI. The card shows the number of Dataflows, Datasets, Reports, and Dashboards involved in the environment.
Next, just click on the Deploy to Test button.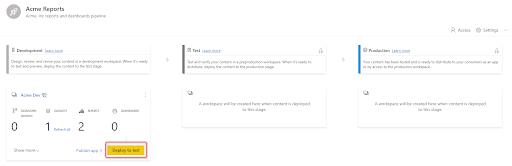
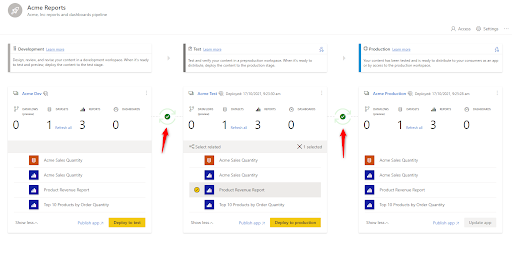
- The dataset and content in your development workspace are now copied to the Test Workspace. Power BI created a new premium workspace automatically with the name YourDevelopmentWorkspaceName [Test], as indicated in the screenshot below.
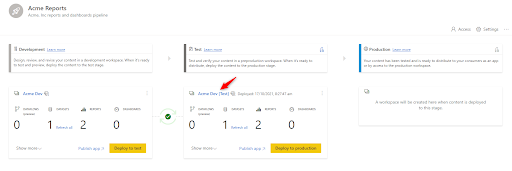
The green tick between the Development and Test workspaces indicates they both are in sync.
You can always rename the workspace based on your organization’s naming convention standards using the Workspace Settings option, as shown below.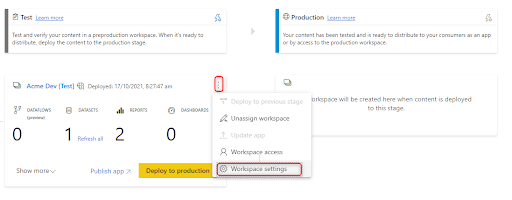
- As the datasets in the Test workspace are directly deployed from the Development environment, they are connected to the Dev data sources still. You can point them to the data sources in your Test environment by following the steps below in your Test environment. Click on the lightning icon in the top of your test card:
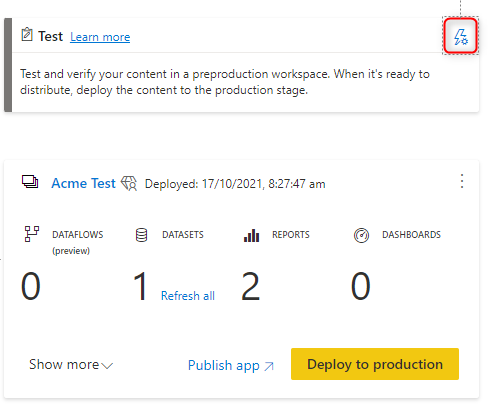
Now click on each of the Datasets shown, and update its Data Source and Parameter rules. For example, in the below screenshot, the Acme Sales Quantity is the only dataset.
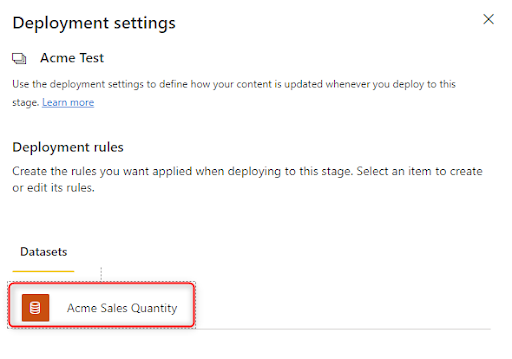
Now click on Add Rule button for your Data Source or Parameter as needed, and click the Save button. In the below screenshots, the Data Source for the selected dataset is replaced with the Test database.
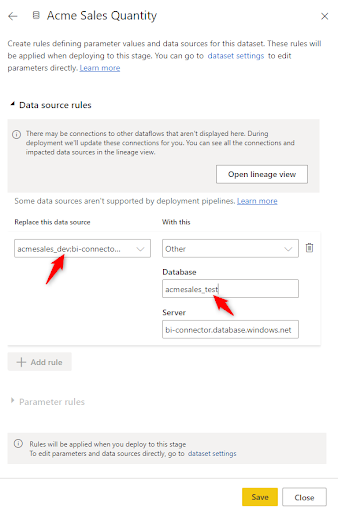
After updating the data source and parameter rules, the green tick must remain (as in the below screenshot) to show that the dataset and contents are in sync between the 2 environments (even though they are connected to the data sources in different environments).
- For deploying your test content to the production environment, just click the Deploy to Production button and repeat steps 7 and 8 on the Production card. Once you’ve successfully deployed and changed the parameter and data source rules, the screen will look like below, showing a green tick between your test and production cards.
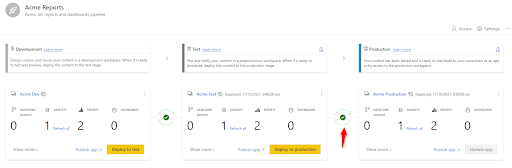
Now you have successfully deployed the Pipeline in Power BI from the scratch.
How to Manage Deployments When a Change is Made?
We’ll now see how to manage your pipeline when you make a change in your Development environment.
For example, let’s consider a new report was added in Dev.
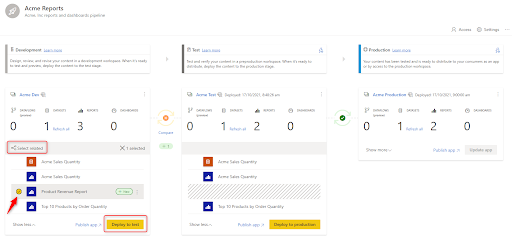
So your Deployment Pipeline will first indicate there are some differences between your Development and Test environments (though the Test and Prod are in sync now), as indicated below. You can just click Compare to know what’s exactly the difference.

Now Power BI highlights the number of differences between the Dev and Test, and which exact item(s) is causing the difference.
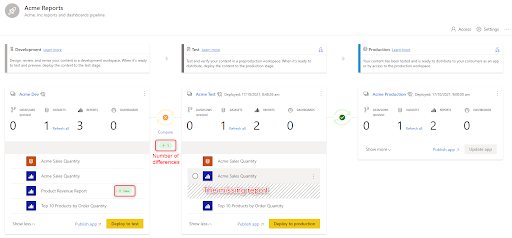
Now you can simply select the missing item and click the related items option (or select all), based on your scenario and Deploy to Test.
Done? Now your test and prod will not be in sync as indicated below. Repeat the steps between test and prod, and sync them.
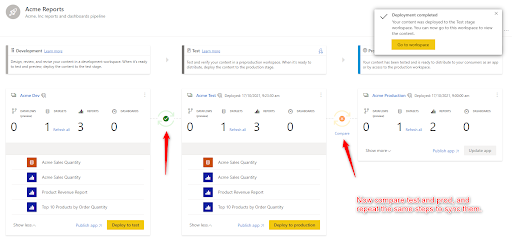
Once you sync test and prod, you can see the green tick between those cards as well.